This post has been sponsored by Loblaws. Although they have provided me with financial compensation and products, my opinions and words are all my own. I am in partnership with Loblaws and will be bringing blog posts and recipes throughout the rest of the year, and all partnered posts will be marked as sponsored.
The holidays are one of my favourite times of the year. As someone who loves to cook and bake, and also someone who loves to host and entertain, Christmas and all the festivities make it the perfect time of year for me. (Not to mention the fact that Toronto is beautiful when it’s snowy).
I typically like to plan out when I’m going to be hosting but I try and keep the home ready for last-minute visitors and friends who want to drop by for a coffee and a chat.
Accommodating a few guests for a coffee though is much easier than a few friends who you’ll need to be feeding, which is why I have a trusty notebook of last-minute appetizer and meal ideas for when I may be caught off guard.
That being said, even the most seasoned host gets caught with almost no ingredients in the fridge and almost no time before everyone is about to drop by. So, what do you do then? You get creative! As a Food Lover, I know that you can make something delicious and well-liked out of nearly any ingredient. So when I received this month’s #FoodLoversUnite challenge from Loblaws to develop a few recipes with 5 ingredients or less that take 20 minutes or less, I knew this was my chance to create a few ideas that will hopefully save you in a last-minute sprint to get everything together!
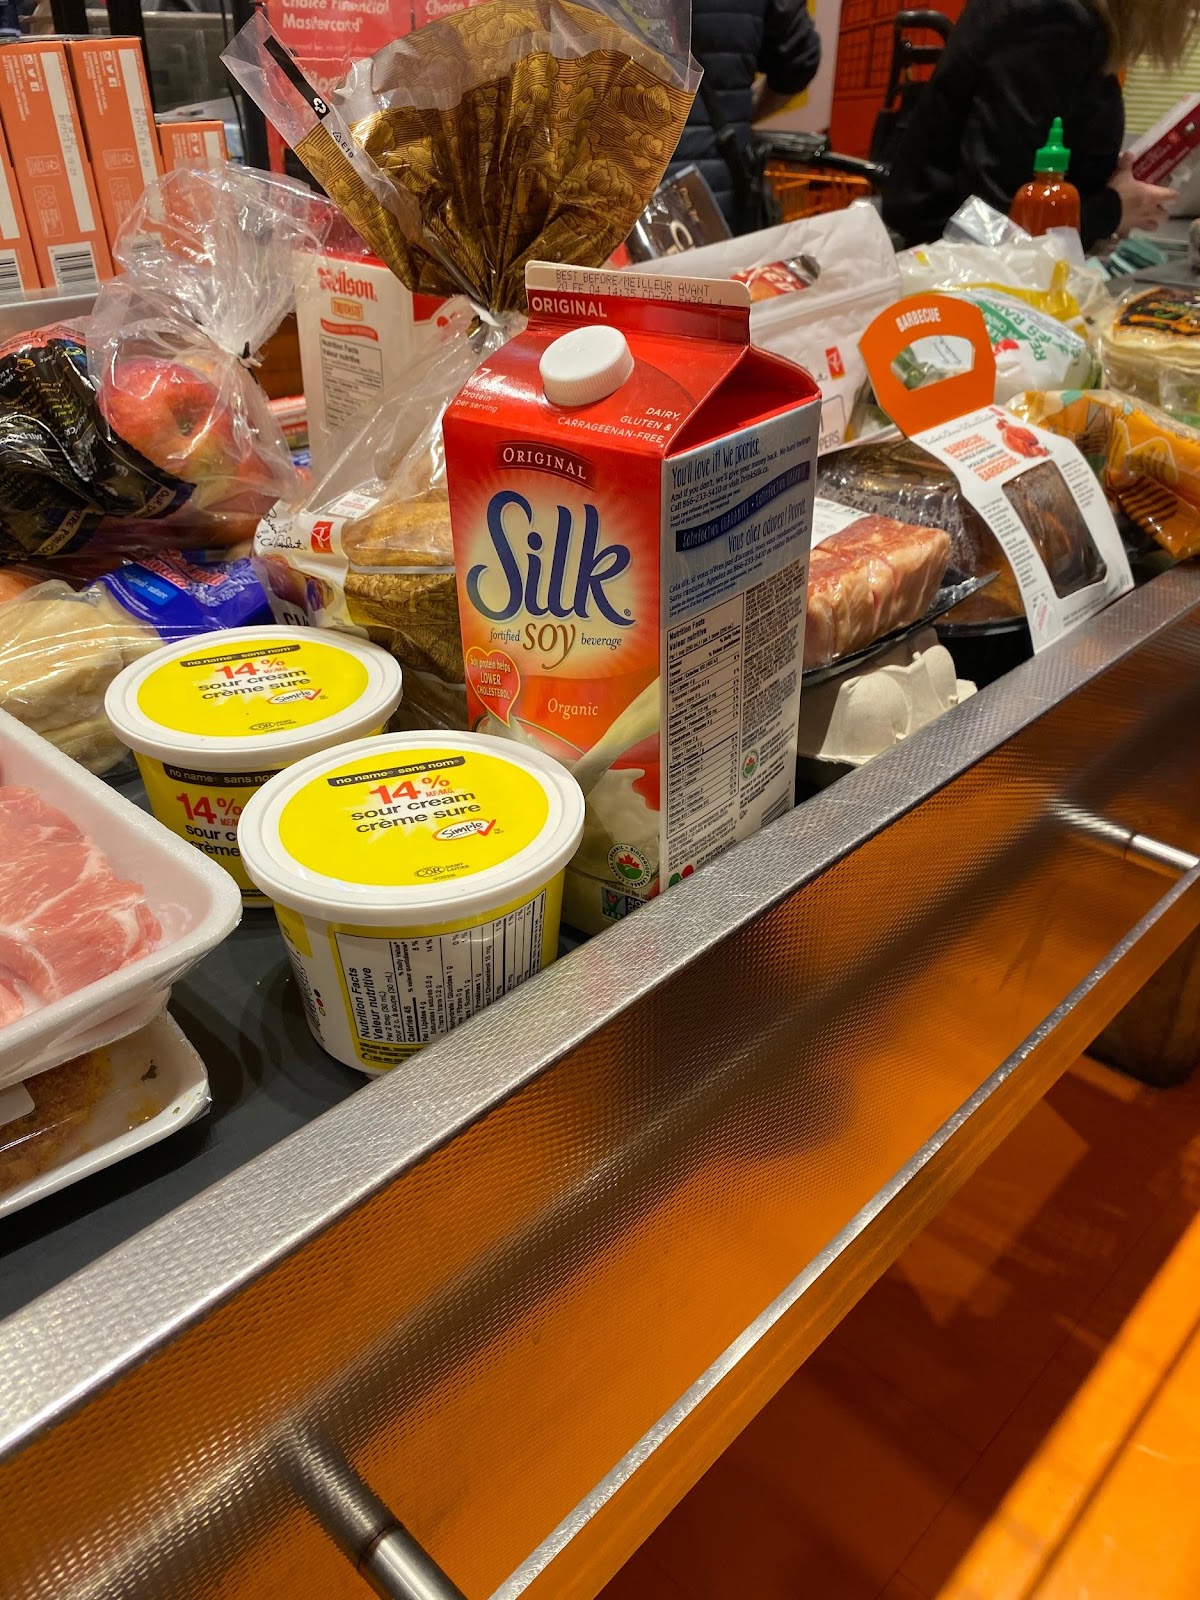
But where do you even start? Well, this time I started at my neighbourhood Loblaws for a little inspiration.
After wandering the aisles for a little while, I knew I was going to have to make a few recipes that would use some common ingredients, and would be things that most people would have in their home already (or at the very least, were inexpensive items to pick up on the way home).
With my items picked, I headed back home and went straight to the drawing board and I ended up with three recipes I am very happy with! Mini Smoked Salmon Sandwiches, Mini Cheesy Quiches, and Mini Bacon Cheddar Potato Skins!
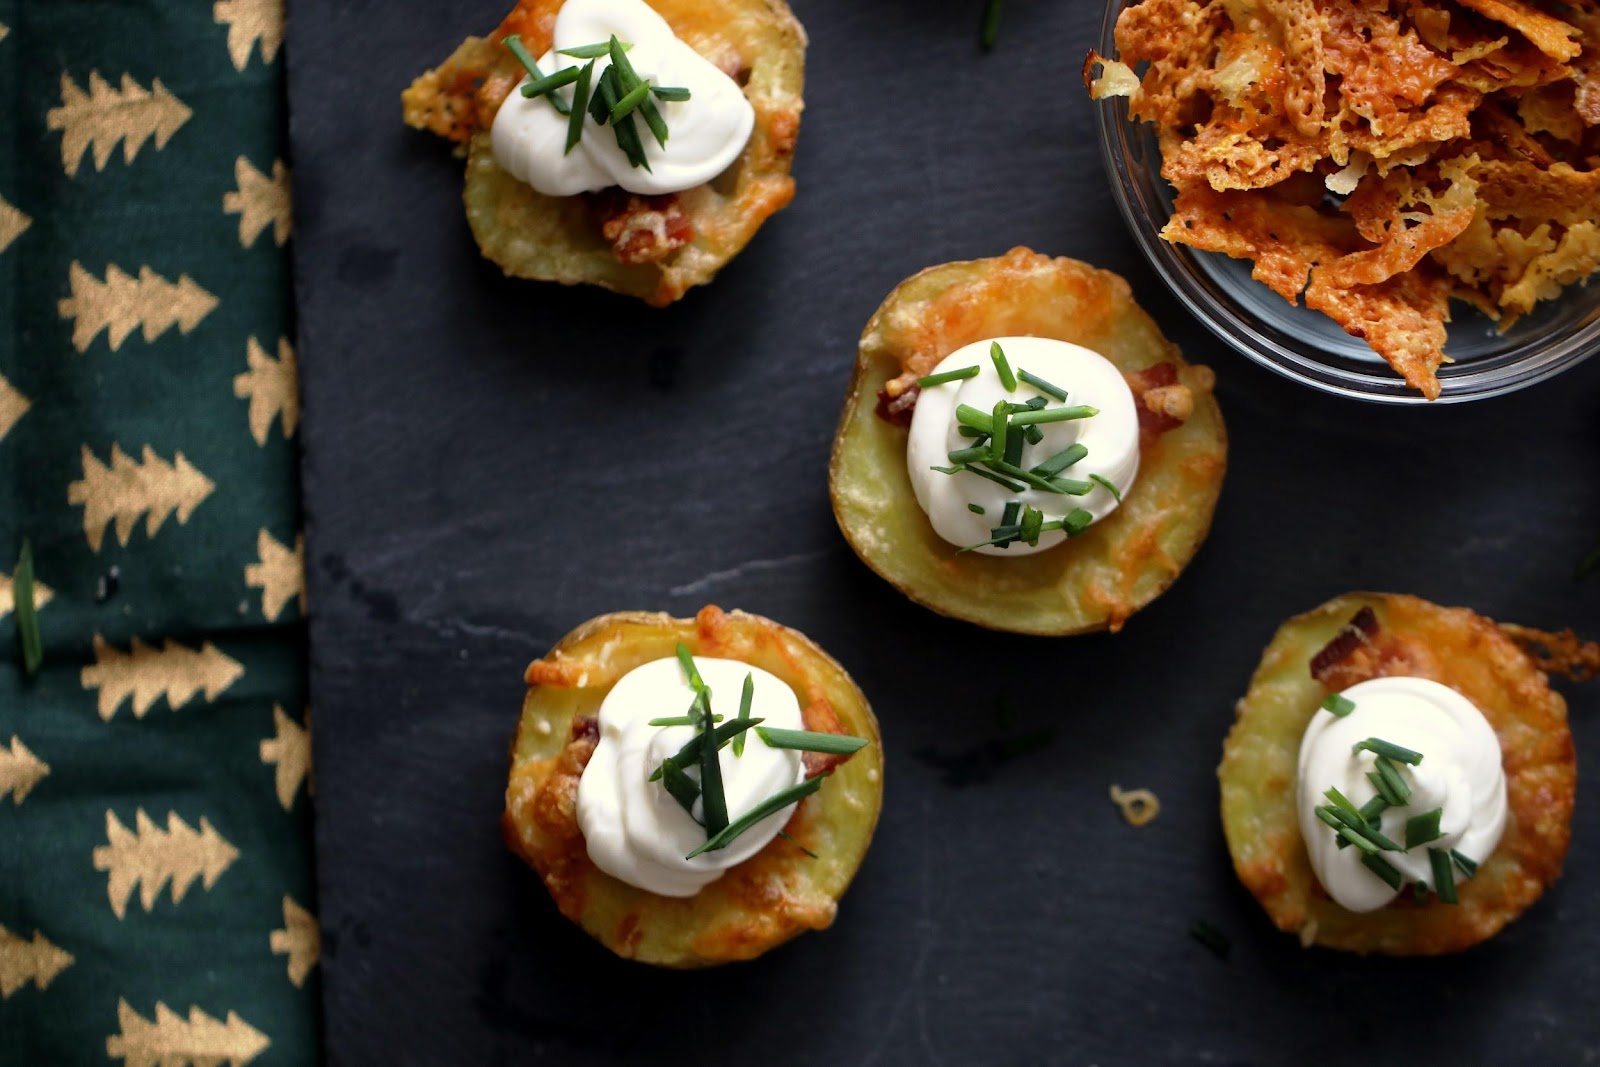
Mini Bacon Cheddar Potato Skins
Ingredients:
12 PC Golden Little Gems Yellow Mini Potatoes- halved
¼ Cup grated parmesan cheese
1 Cup shredded cheddar cheese
8 Pre-cooked bacon strips, crumbled
½ cup Sour cream
Instructions:
Preheat the oven to 475F
Using a spoon, scrape some of the insides of the potatoes out so there is a well for your ingredients
On a parchment-lined baking sheet with the prepared potato halves, sprinkle parmesan cheese, cheddar cheese and bacon in each potato (don’t be afraid to be generous here, any of the cheese that missed the potatoes will melt into cheddar and parmesan crisps on your tray)
Bake for 10-12 minutes or until everything looks cooked and crispy (you’ll be able to tell by looking at it)
Let cool slightly, and top with a dollop of sour cream and fresh chives if you have them.
Serve and enjoy!
Mini Cheesy Quiches
Ingredients:
1 Package of Frozen Mini Pie Dough (these should have 8 premade shells)
¾ Cup 3.5% milk
1 Large egg
¾ Cup shredded cheddar cheese
1 Medium bell pepper, diced
Instructions:
Preheat oven to 375F
Place shells on a parchment-lined pan
Whisk egg and milk together and set aside
Sprinkle half of the cheese into the mini pie shells and top with the diced pepper
Pour egg mixture into the pie shells, and top with remaining cheddar cheese
Bake for 15 minutes
Let cool slightly and serve with fresh chives or sour cream if available.
*This recipe also works nicely with bacon instead of the peppers in you’re looking for a saltier treat*
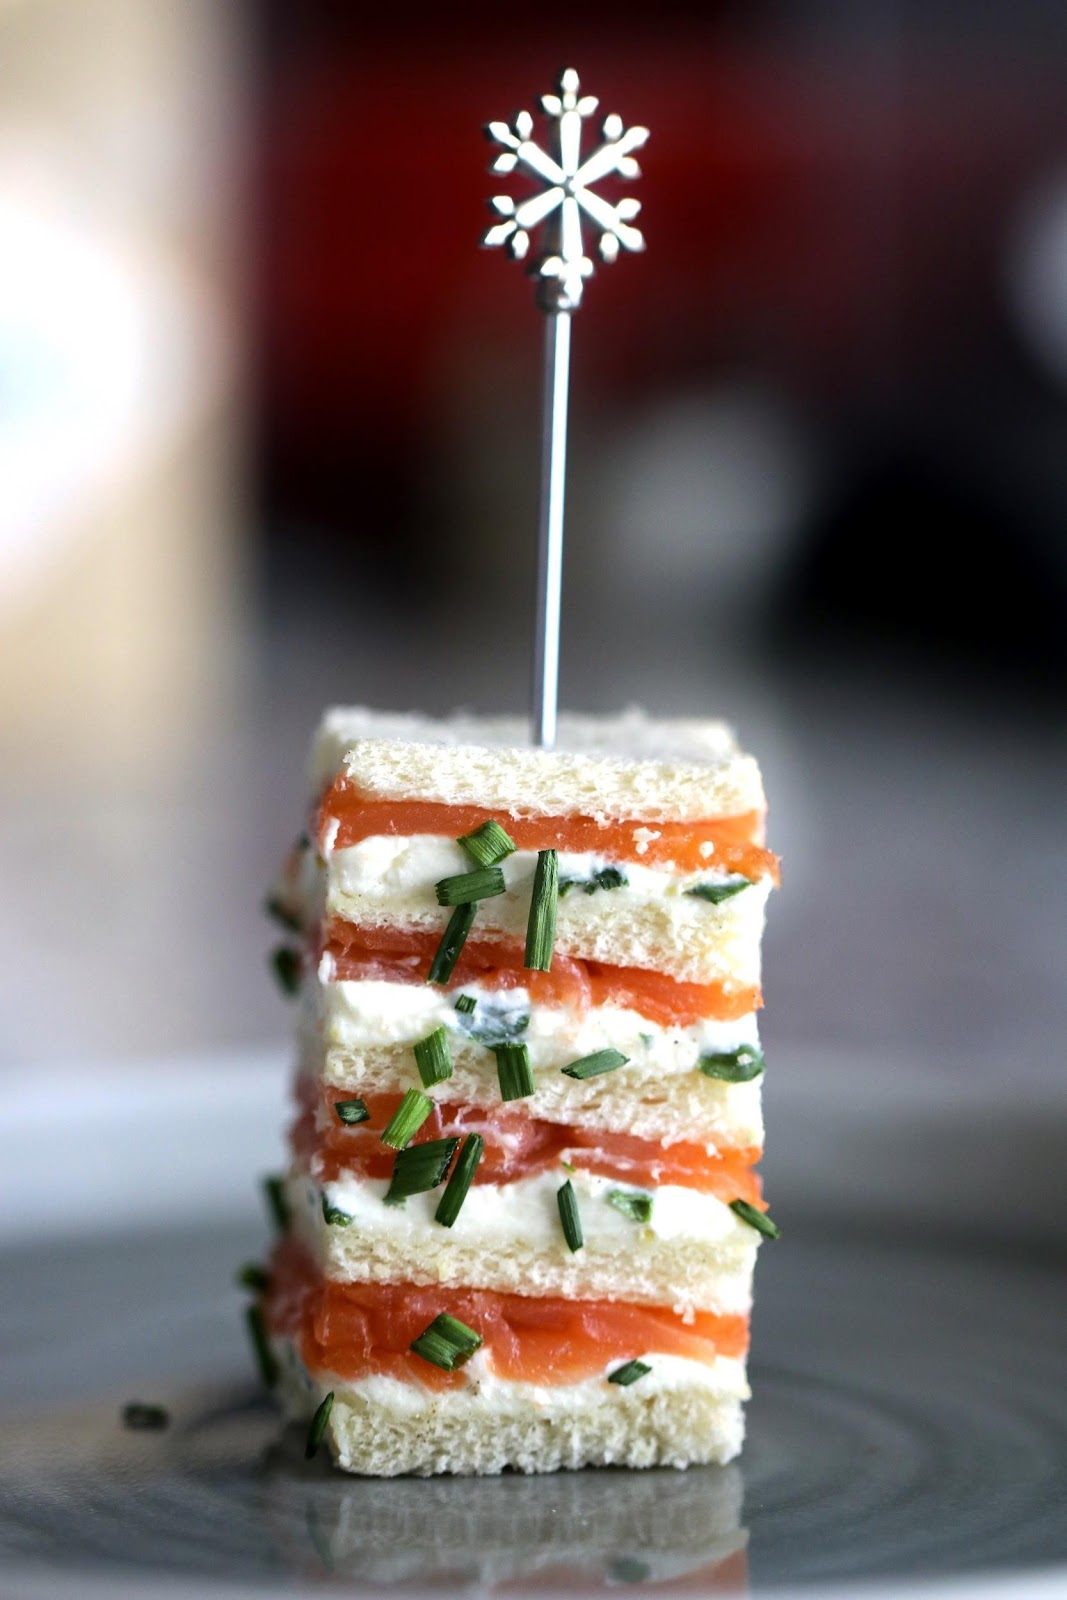
Mini Smoked Salmon Sandwiches
Ingredients:
1 Package PC Tramezzini White Crustless Bread
1lb Smoked Salmon Slices
250g Softened Cream Cheese
½ Cup Sour Cream
⅓ Cup chives, chopped
Instructions:
Mix cream cheese, sour cream and chives together in a medium-sized bowl and set aside
Place one slice of the bread on a cutting board and smear with ¼ of the cream cheese mixture and top with ¼ of the smoked salmon
Repeat by placing another slice of bread on top of the smoked salmon and starting again with ¼ of the cream cheese mixture and ¼ of the smoked salmon. Repeat until finished, ending with one slice of bread on top
Use a serrated knife, cut the edges to square off any edges without mixture and carefully cut into even-sized strips before cutting again into bite-sized squares
Serve and enjoy!
*This recipe also works nicely with some zested lemon in the cream cheese mixture*
If you want to make this and have any questions, feel free to DM me @JackDHarding on Instagram, and if you make it, please tag me and show me your creation.
This post has been sponsored by Loblaws. Although they have provided me with financial compensation and products, my opinions and words are all my own. I am in partnership with Loblaws and will be bringing blog posts and recipes throughout the rest of the year, and all partnered posts will be marked as sponsored.
There is nothing better to me than being able to head into the kitchen and unwind, put some music on, and cook up a storm. Cooking is very therapeutic for me, and not something I view as a stress, but rather something I look forward to. I often get teased by friends and acquaintances for the fact that at any given time I have hundreds of pages of magazines and cookbooks dog eared with notes about how I want to make them or make them to my liking.
That being said, even people like me who live to be in the kitchen, have days where they just don’t have the time or the energy to whip up a delicious meal. This is where the ready-made section of the grocery store comes in.
Loblaws ready-made foods have been a favourite of mine ever since I’ve lived on my own. The packaged salads, baked goods, soups and more have always made the perfect addition to my grocery lists each week, making sure I always have something fresh and ready for the days I’m feeling tired. They’re also great for the days when I don’t have any food in the fridge and can walk down to the Maple Leaf Gardens location and pick something up that’s just as good as if I made it myself.
My absolute go-to favourite though is Loblaws Rotisserie Chicken- in particular, the barbeque one. It is such an old faithful, and there hasn’t been a time I’ve picked one up that I’ve been disappointed. So, when for this month’s #FoodLoversUnite I was challenged to develop a recipe using one of the Grab and Go items, I knew exactly what I wanted to use.
Knowing that the rotisserie chicken already had a ton of flavour, I wanted to develop a recipe that could piggyback off of some of those flavours, helping to complement them and build off of them. Since the weather in Toronto has already started to get cold and snowy, I also wanted something that would be comforting and warm, plus make you feel good as soon as you ate it. That’s how I ended up making rotisserie chicken empanadas!
Ingredients:
250g Shredded Rotisserie Chicken (a mix of the breast meat and dark meats works well)
½ Cup cream cheese (softened)
1 Package of Taco Seasoning Mix
⅓ Cup Shredded Cheddar Cheese
¼ Cup Sour cream
¼ Cup chopped chives 1 Package of Refrigerated Pizza Dough (or readymade pizza dough from the grab and go section)
1 egg
Instructions:
Preheat oven to 400F
In a medium-sized bowl, combine chicken, cream cheese, cheddar cheese, sour cream and mix until well combined. Add taco seasoning and chives, stirring to combine. Set aside
Roll the pizza dough until ½” thick and cut out 2 ½” rounds (a lid from a can works nicely for this). Discard the scraps
Place a small spoonful of the chicken mixture (about 1.5-2 Tsp) in the center of each round, and fold the dough over, crimping the edges with a fork. Repeat until you are out of chicken
Beat the egg in a small bowl, and using a brush, brush each empanada with egg (this will help them brown nicely in the oven)
Bake in the preheated oven for about 15 minutes or until golden brown
Serve with guacamole and sour cream and enjoy!
If you want to make this and have any questions, feel free to DM me @JackDHarding on Instagram, and if you make it, please tag me and show me your creation.
This post has been sponsored by Loblaws. Although they have provided me with financial compensation and products, my opinions and words are all my own. I am in partnership with Loblaws and will be bringing blog posts and recipes throughout the rest of the year, and all partnered posts will be marked as sponsored.
It’s officially fall, which means it is my favourite time of year! I love this time of year because the weather is getting cooler, you can start bringing the sweaters and coats out of the closet, and the food gets to be warm and hearty! As a kid, I always enjoyed this time of year because even though it meant it was back to school time, it also meant that my mom was going to start having delicious dinners ready for when my brother and I were back from school.
There is nothing better than coming back home and knowing that there was going to be a hearty dinner waiting for you after a long day. It was during those years that I was introduced to some of my favourite foods, including some that I still call my favourites to this day. We would have tourtière (a French-Canadian dish), scalloped potatoes, lasagnas, homemade fries and chicken nuggets (which are SO much better when homemade).
As you can imagine, as I got older and started to try cooking for myself, I looked back at these dishes as starting points for inspiration and wanted to learn how to make them myself. Some of the easier things like homemade fries and chicken nuggets were first, and things like scalloped potatoes and tourtière were near last (as they were much more advanced).
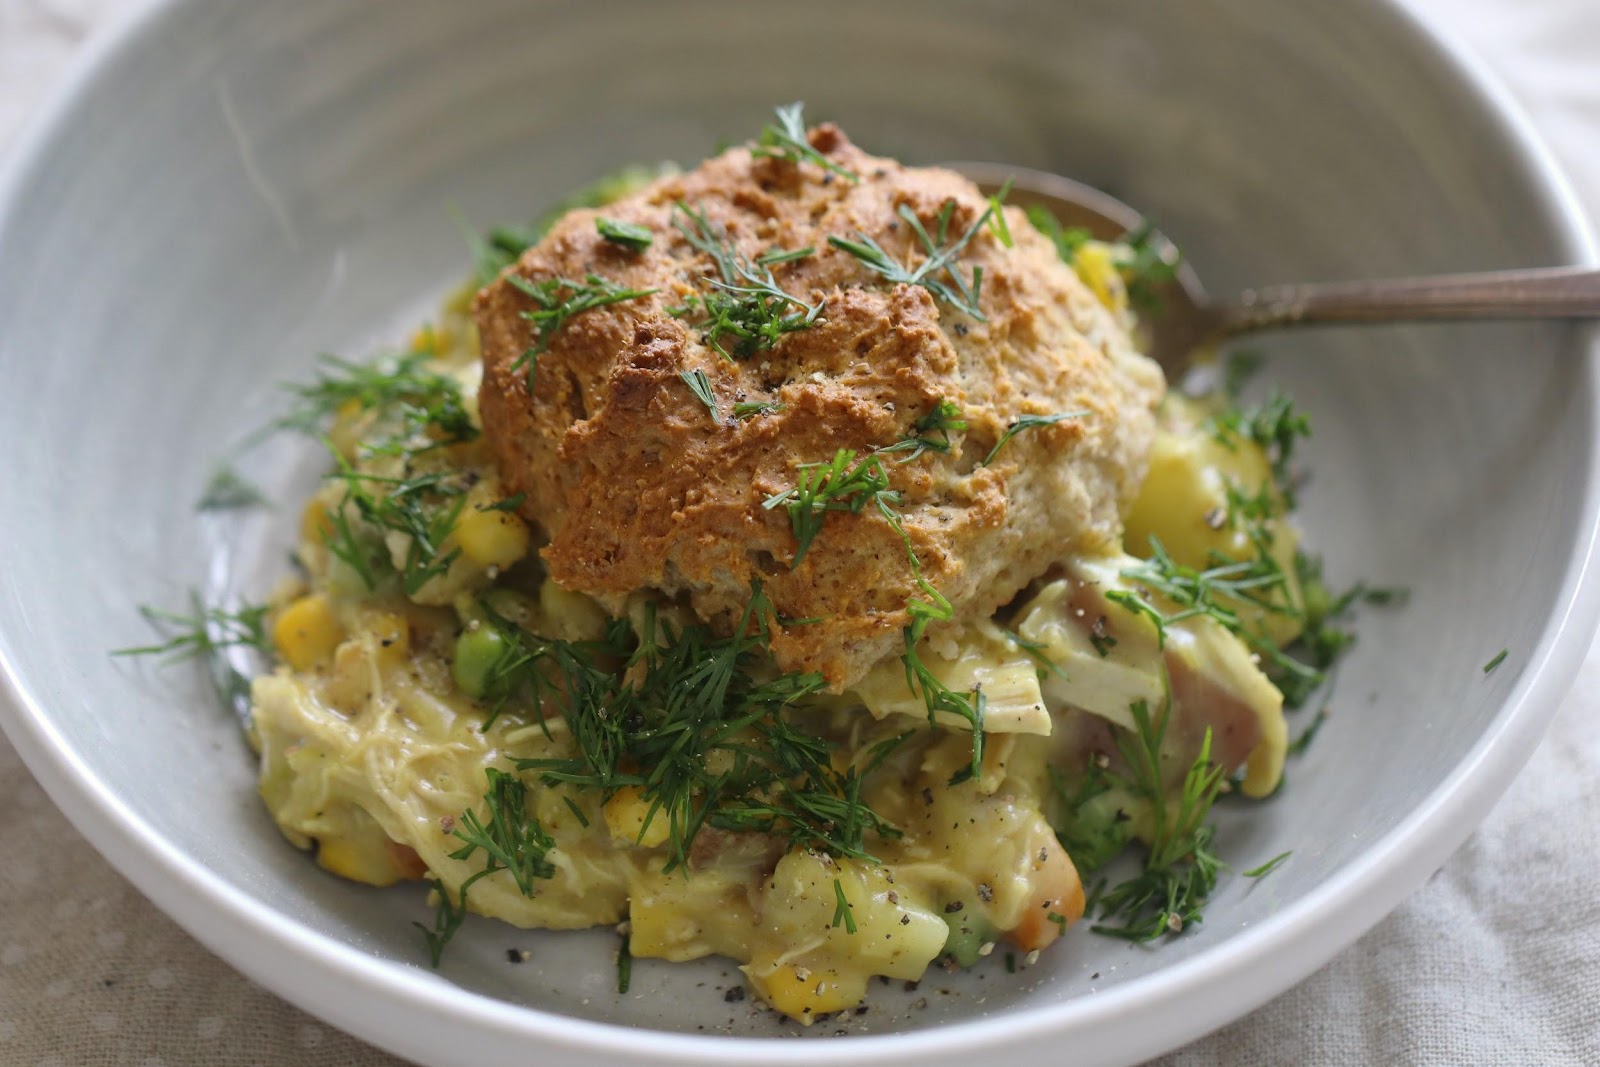
One of my all-time favourites that my mom used to make for us, though was chicken pot pie. To me, it was one of the perfect dinners. It was rich and creamy, had a great mix of textures (between the veggies, the creamy base, and the chicken, you had a delicious feeling in your mouth), and let’s not forget about the crust- light and flaky!
This month as part of the #FoodLoversUnite campaign, I got to work with Karley, the in-store registered dietitian at the Maple Leaf Gardens location (if you remember, I met with her before to find ways to incorporate more plant-based protein into my diet) to find ways to take my favourite chicken pot pie and find ways to make it more health-conscious without losing any of my favourites parts! Loblaws has a network of over 70 dietitians across Canada to help you achieve your health and wellness goals in a way that works best for you and your body. Through personalized consultations and store tours, the in-store dietitians help customers reach and maintain their healthy weight and manage their digestive concerns. To learn more or book an appointment, visit bookadietitian.ca.
Karley walked me through how I could make some small changes to this lifetime favourite and make it something that can still be just as delicious while focusing on it being nutritious and packed with ingredients that will help better fuel my body! She showed me some more common-sense substitutions like 2% milk instead of whipping cream, but also introduced some ideas I hadn’t thought of before like including cauliflower rice, reducing overall sodium content, and how to better the overall nutritional profile of the dish. Even though I consider myself fairly well educated when it comes to making healthier choices for meals, it was fantastic to trade ideas back and forth with Karley and work to introduce new ways of thinking into how I approach meals and recipe development. I highly suggest utilizing the Loblaws in-store dietitian services if you’re interested, I guarantee you’ll be surprised with how valuable they are.
I won’t make you wait any longer, here is my recipe for my health-conscious chicken pot pie!
Ingredients:
2.5lbs cooked chicken breasts, cooked and shredded (about 4 large chicken breasts)
2 cups diced potatoes with skin-on (yellow or red)
2 tsp minced garlic
1 tsp garlic powder
¼ cup diced white onion
¼ cup chopped green onion
3 carrots, diced
1 leek, finely chopped
½ cup fresh peas
½ cup fresh corn
1 tsp salt
1 tsp black pepper
Sauce:
2 cups low sodium chicken broth 11/2 cups 2% milk
¾ cup all-purpose flour
1 tsp garlic powder
½ tsp salt
½ tsp white pepper
Biscuit Crust:
½ cup whole wheat flour
½ cup all-purpose flour
1 ½ tsp baking powder
½ tsp baking soda
1 Tbsp sugar
½ tsp salt
1.5 tbsp cold butter
½ cup 0% MF Plain Greek Yogurt
¼ cup 2% milk
1 large egg
Instructions:
Start by making the sauce:
In a small bowl whisk the garlic powder, salt, white pepper and flour
Pour in the milk and whisk to combine
In a large pot, bring the chicken broth to a boil and stir in the milk and dry ingredient mixture to the boiling water and cook over medium heat until the mixture is thick. Remove from heat.
Then make the filling:
Preheat oven to 375F
Grease a cast-iron skillet and set aside
In a medium-sized pan, sauté the potatoes and garlic for 10 minutes or until brown. Add the onion, carrots, leeks and garlic powder and cook until soft (10 minutes or so).
Add the peas, corn and chicken and stir to combine, add salt and pepper.
Pour in the sauce and stir to combine. Add the sauce and ingredient mixture into the cast-iron skillet and set aside.
Then make the topping:
In a large bowl combine the flours, baking soda and powder, sugar and salt and whisk to combine.
Cut the butter into smaller pieces and add them to the dry ingredients, using a pastry blender to combine until you have coarse crumbs.
Add the yogurt, milk and egg and combine.
Now combine:
Divide the batter into biscuit sized pieces and place on top of the pre-made potpie mixture in the cast iron.
Cook on the middle rack of the oven for 35 minutes or until mixture is bubbly and biscuits are golden brown. Let cool for 10 minutes before serving.
If you want to make this and have any questions, feel free to DM me @JackDHarding on Instagram, and if you make it, please tag me and show me your creation.
Fried chicken has to be one of the best comfort foods. It’s warm, it’s salty, it is a punch of flavour and a warmth that makes you feel fantastic (at least until you come down off of the fried chicken-high).
My childhood memories of fried chicken were exclusively chicken you would get from a fast-food restaurant. My parents didn’t have a deep frier and frying wasn’t something that my mom ever want to do (and in fairness, as someone who now has to clean his own kitchen, I can understand why). So as you can imagine, until I was probably 20 my idea of fried chicken was limited to KFC and McDonalds Chicken Nuggets. So as you can imagine when I first had fried chicken that wasn’t from a box or a chain, I thought all of it was AMAZING. It took me a while before I knew what I felt what “good” or even “great” fried chicken is.
While there are plenty of types of fried chicken (did you know Country Fried, Korean, Nashville and other types all have their own methods, techniques and flavours?) I’m quite preferable to buttermilk fried chicken when I’m making it myself. That’s what brings us to this recipe. I’ll be honest, this doesn’t come together in 5 minutes and will require some planning. It is going to sit for at least 6 hours, so I suggest planning this out and prepping in the morning before work and coming home and frying it up.
Ingredients: 8 Chicken Drumsticks 11/4 Tsp Ground White Pepper 1/4 Tsp Ground Black Pepper 11/4 Tsp Sea Salt ( I typically use an Herbed Salt like an Herbes De Provence Salt) 11/4 Tsp Smoked Paprika 1/2 Tsp Dried Rosemary 1/2 Tsp Cayenne Pepper 1/2 Tsp Garlic Powder 1/4 Tsp Dried Thyme 1/4 Tsp Dried Oregano 21/4 Cups Buttermilk
Instructions: In a large bowl, toss chicken with both peppers and salt, as well as all spices up until the buttermilk and mix to combine and coat well. Add buttermilk and stir well to properly combine. Cover tightly with plastic wrap and let sit in the fridge for 6-8 hours. Once the chicken has sat for 6-8 hours combine all the ingredients in the flour blend (except the oil) and whisk until thoroughly combined. Place in a shallow dish (a baking sheet with a rim works nicely). Remove the chicken from the buttermilk and dredge in the flour mix, tapping off any excess and place on a dry plate. Using a fry thermometer, heat the oil in a heavy-bottomed pot or dutch oven to 350F. Adding the chicken 4 drumsticks at a time (max), cook for 10-15 minutes, ensuring they don’t touch. Use tongs to flip them 1-2x throughout frying. Repeat until all 8 drumsticks are cooked.
Please note: This recipe can be easily doubled. When substituting drumsticks for thighs or wings, adjust cook time accordingly.
I hope you enjoy this recipe and try and make it yourself. If you make this or have any questions, feel free to DM or tag me @JackDHarding on Instagram!
I typically enjoy a savoury breakfast. I’m a bit of a creature of habit in that my go-to breakfast is usually one English muffin, one egg, and a small squirt of ketchup (no judgement please). Sometimes if I am feeling *fancy* I’ll add some turkey bacon or make a ground chicken patty to make a homemade McMuffin.
Every once and a while though I wake up craving something a bit sweeter. I used to go grab a cinnamon raisin bagel or opt for a croissant, but I wanted something I didn’t have to leave my condo for (especially on a cold winter day). That’s where these muffins come in! I always leave a bunch of them individually wrapped and frozen in the freezer, and pop in the oven for a few minutes in the morning. Between the smell of the cinnamon, the warmth of the muffin, and the soft feeling of the baked apples, these are a perfect breakfast treat and will help make your day whenever you have them!
Ingredients:
2 Cups All-Purpose Flour 1 Tsp Cinnamon 1 Tsp Nutmeg 1/2 Tsp Cloves 1/2 Tsp Ground Ginger 1 Tsp Baking Powder 1/2 Tsp Baking Soda 1/2 Tsp Salt 1/2 cup unsalted butter, softened 1 cup granulated sugar 2 large eggs (room temperature) 11/2 tsp vanilla extract 2 large golden delicious apples (cored, chopped) Topping: 1/2 cup dark brown sugar 1 Tbsp all-purpose flour 1/2 tsp cinnamon 1/4 tsp ginger 1/4 tsp nutmeg 2 tbsp cold butter cut into small pieces
Instructions:
Preheat oven to 375F and line a muffin tin with paper liners.
(from the muffin ingredients) In a medium bowl, combine the flour, spices, baking powder and soda, and salt. Whisk together.
In the stand mixer on medium, beat the butter, sugar, eggs and vanilla until smooth. Remove the bowl from the stand mixer and stir in the apples. Add the flour mixture and mix until moistened. Be careful not to overmix.
Fill the cupcake tins about 3/4 of the way with the batter. There should be enough batter for 12 muffins.
(for the topping) Whisk together sugar and spices in a small bowl and add the butter. Using your fingers or a fork, mix the butter and the sugar/spice mixture until it resembles crumbs. Sprinkle the topping onto each muffin.
Bake for 18-22 minutes until a wooden skewer inserted in the middle comes out clean.
Cool in the pan for 5-7 minutes and remove and let totally cool on a wire rack. These will last in an airtight container at room temperature for 3-4 days, or freeze well for up to 3 months (just thaw and reheat before eating again).
If you made these, please send me a picture of them or upload them to Instagram and tag me at @JackDHarding. Feel free to send me any questions or comments as well!
Peanut butter cookies are one of my all-time favourites. For a lot of Canadians around my age, the recipe from the back of the Kraft Peanut Butter Jars was the gold standard for parents, and I remember having those beautiful little golden discs with the cross-hatching on top on plenty of days after school.
As I learned to bake, they were also one of the first cookies I made because: 1) They’re delicious and 2) They’re easy to make!
I have played around with this recipe for years, and I’m really happy with where I’ve gotten it to. I hope you enjoy it!
Ingredients:
11/2 cup natural peanut butter (sugar-free) 3/4 cup brown sugar 3/4 cup granulated sugar 3/4 tsp baking soda 1/2 tsp salt 1 extra-large egg Flaky sea salt (Maldon’s Smoky Sea Salt is the best for this)
Instructions:
Preheat oven to 350F and place rack in centre of the oven.
In a large bowl, beat peanut butter and sugars together with baking soda and salt until mixture is very smooth (this is important).
Beat in the egg until the mixture starts to resemble dough and holds together.
Using a 1/4 cup sized scoop, roll portioned balls of dough and place on a parchment-lined baking sheet (2-3″ apart, they will spread while baking), using a fork to flatten the balls and cross hatch the top. Sprinkle flaky salt on top of each cookie.
Bake for 10-12 minutes until golden brown. Let cookies cool on the baking sheet for 10 minutes and then move to a wire rack to cool completely. These cookies will last in an airtight container for 5 days or can be frozen for up to 3 months).
I hope you like these as much as I do! If you make them, please tag me @JackDHarding on Instagram and feel free to DM with any questions or comments!
Raisins get a lot of hate on the internet. There are countless memes about finding a raisin in your cookie instead of a chocolate chip and having it be one of the worst things that could happen. People compare them to every sort of terrible thing, and honestly, I don’t get it.
I’ve enjoyed raisins since I was a child (those little boxes of raisins at snack time anyone?) and still love them today! While they’re not the healthiest snack in the world, I will always choose a serving of raisins over a serving of chocolate chips!
As someone who likes to bake, you can do a lot with raisins! You can soak them in different liquids (like rum) and bake them into fruit cakes or other cookies or you can keep them as-is and bake them into bread, cookies, bars, etc….
I’m excited to share my recipe for oatmeal raisin cookies because they’re honestly one of my all-time favourite cookies. They have a good weight, they bake easily, and they’re really hard to mess up! They even freeze well so you can store them in the freezer for when you want a ‘surprise’ cookie one evening. This is the recipe for my favourite Oatmeal Raisin Cookies.
Ingredients:
11/4 cups all-purpose flour 1 tsp ground cinnamon 1 tsp baking soda 1/2 tsp baking powder 1 tsp salt 1 tsp nutmeg 1/4 tsp ground ginger 1/4 tsp ground cloves 1 cup softened butter (unsalted) 1 cup granulated sugar 1/2 cup brown sugar (firmly packed) 1 egg 2 1/2 tsp vanilla extract (preferably high quality/Madagascar) 21/4 cup rolled oats (instant will not work for these) 11/4 cup raisins
Instructions:
Preheat oven to 350F.
Whisk together flour, spices, baking soda, powder and salt in a medium bowl and set aside.
Using a stand mixer fitted with the paddle attachment beat the butter until smooth on low speed. (2 minutes)
Increase speed to medium and beat in both sugars until smooth. (2-3 minutes)
On low, beat in egg until well combined and add in vanilla extract. Turn mixer off once combined.
Using a wooden spoon, mix in dry ingredients until just combined (some streaks of flour are okay). Add in the oats and raisins, mixing until well combined. Refrigerate for 30-60 minutes.
Line baking sheets with parchment paper and using a 1/4 cup sized icecream scoop, portion the dough and place onto the baking sheets, leaving 2-3″ between each cookie. (When you place them on the tray, flatten them slightly to ensure a cookie with even thickness).
Bake in the centre of the oven for 12-14 minutes until golden brown around the edges. Remove from the oven and let cool for 10 minutes on the sheet before moving to a wire rack. These will last for a few days in an airtight container or can be frozen for up to 3 months.
If you make these, please tag me @JackDHarding on Instagram and always feel free to DM questions!
I love how when you ask people about some of their favourite memories, they often revolve around food. Whether it is dinners with their families, dishes they used to cook in the kitchen with someone, or even stories about travel and adventure which ultimately always end up in a story about where they ended up eating.
Food is also great at making people reminisce. Something as simple as a taste or a smell can bring you back to a special place in time. Next time you’re chatting with someone you don’t know that well, ask them about some of their favourite foods- I guarantee it will not only help you get to know them better, but it will help you connect with them in a much more meaningful way.
I have many of these memories from my childhood- and one in specific revolves around the recipe I’m sharing with you today. Every year until I moved out practically my family and I would go to the CNE (Canadian National Exhibition) together. We didn’t have too many traditions as a family, but this was always one of them.
What became one of the things I would look forward to was getting a Coke in a collectors cup (they would have exclusive reusable cups often in weird shapes or with fun straws) and getting a corndog! There were plenty of vendors that sold corndogs around the fairgrounds, but there was one that made them the best (in my opinion). They were the best mix of sweet, savoury, with just a bit of heat. They came in two sizes, regular (normal hotdog) and jumbo (a footlong hotdog). The batter was a great thickness, balancing out the thick juicy hotdog that was inside.
Remembering that corndog the other day, and having just picked up more cornmeal, I thought, “Why not corndogs?” So I started my corndog creation journey. This took me a few tries to get to where I loved it and I am happy I kept trying because these are a real crowd pleaser now! In fact, I’m making them for my parents next weekend for my birthday.
Make sure to let these cool a bit before eating. They won’t be too hot to eat, but I find the flavour comes out best once they’ve had a chance to sit.
Ingredients:
10 Regular Hotdogs, or 6-8 Jumbo dogs
1 1/4 Cup All Purpose Flour
1 Cup Cornmeal
3 1/2 Tbsp Granulated Sugar
1 1/4 Tsp Kosher Salt
1/2 Tsp Baking Soda
1/2 Tsp Ground Black Pepper
1/2 Tsp Cayenne Pepper
1/4 Tsp Smoked Paprika
1 Cup Buttermilk
2 Extra Large Eggs
Vegetable Oil for frying
Instructions:
Using a paper towel, ensure the hotdogs are completely dry and then skewer with wooden sticks. Set aside.
In a large bowl, combine flour, cornmeal, sugar, salt, baking soda, black and cayenne pepper, and paprika. Whisk together.
In a smaller bowl, whisk together the buttermilk and egg until smooth and then pour into the bowl with the dry ingredients. Mix ingredients until just mixed. Let sit.
In a deep dish pot filled halfway up (3-4″) with oil, heat on medium until temperature reaches 375.
Dip the hotdogs into the batter and coat evenly. (Pro tip: coat my hands with flour and grab the hotdog first. The flour helps the batter stick). Ensure there are no holes in the batter. Add the coated hotdogs to the oil in batches of 3. Cook until golden brown (about 3-5 minutes).
Remove hotdogs from oil with tongs and let dry on paper towel. Sprinkle with flaky sea salt as soon as removed from oil.
Repeat this process until the oil gets back to 375F each time.
Serve with mustard or ketchup. Fresh dill goes very well with this batter too!
I hope you love these! I know I sure did. If you make them, tag me on Instagram at @JackDHarding
This post has been sponsored by Loblaws. Although they have provided me financial compensation and products, my opinions and words are all my own. I am in partnership with Loblaws and will be bringing blog posts and recipes throughout the rest of the year, and all partnered posts will be marked as sponsored.
Apart from the time I decided to be vegetarian for a few weeks in my early teens (honestly it didn’t last long and if I remember correctly, ended with me getting chicken nuggets and justifying that they weren’t real meat), I have never really thought about cutting meat out of my diet. Restricting foods in my diet has never worked well for me (you always want what you cannot have, right?) so I have made a serious effort to be mindful of the foods I eat and to keep everything in moderation. This month as part of the #FoodLoversUnite campaign, I’m excited to share some of my journey and some of my stories with you as a way of starting a conversation around food and healthy living. What I love about the #FoodLoversUnite campaign is that it speaks to the fact that everyone is a food lover regardless of what you like to eat or how you like to eat it. Just as important in my eyes is emphasizing the fact there are no right or wrong foods, especially as it relates to overall health and wellness, and that there is a time and place for everything in your diet within reason.
I’ve spoken in the past briefly about weight loss, but it has always been an area of contention for me. Throughout my late teens and early twenties, my weight has fluctuated up and down much to my chagrin. It is only in the last 2 years that I have found a lifestyle that has not only been healthy for me but has led to sustained, slow, long-term weight loss. In addition to eating a (mostly) balanced diet, I also dedicate 3-4 days a week to the gym for bodybuilding and overall strength training.
While I cannot say that this will work for everyone, I don’t think anyone should be trying to say there is a blanket approach that can work for everyone. That is why it is important to do what works for you and don’t be afraid to adjust that as you go.
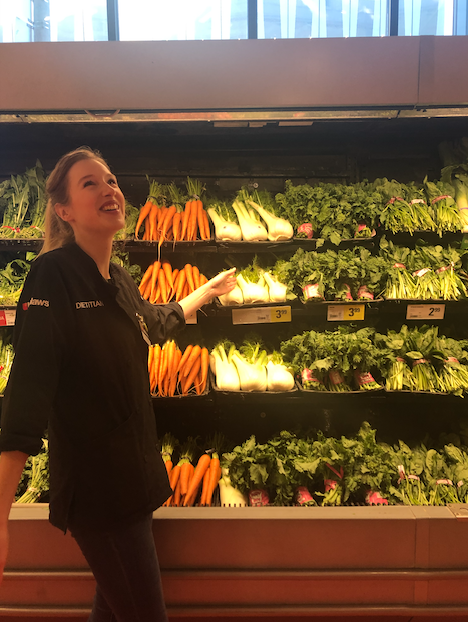
This is why I was excited to meet with a registered dietitian from Loblaws last week. Loblaws offered me the option to spend some time with Karley, the in-store registered dietitian at the Maple Leaf Gardens location to go over some of my eating habits, take a general overview of my health and wellness, and make some recommendations on ways I can help add some more options to meal time! Loblaws has a network of over 70 dietitians across Canada to help you achieve your health and wellness goals in a way that works best for you and your body. Through personalized consultations and store tours, the in-store dietitians help customers reach and maintain their healthy weight and manage their digestive concerns. To learn more or book an appointment, visit bookadietitian.ca.
I’ll be honest, while I knew there was always someone available to talk about food, I had no idea it was a dietitian, and after learning of the breadth and depth of the services offered, it made me realize how valuable it can be to have that service, especially in a place where I buy my food and spend a lot of time each week.
I met with Karley Fallaise, RD and from the very beginning, she was extremely welcoming and made me feel relaxed. [I feel like I must include this because I am AWFUL with doctors, nurses or healthcare professionals. I get extremely nervous, so someone who can make me feel a bit more relaxed from the beginning means a much more positive experience]. We went through some of the basics about me (height, weight, age, general health, medications, etc.) before moving onto lifestyle and food questions.
It was great to think about things like my general stress level on a regular basis, how I feel, and what I eat. As we went through my daily food habits, she was able to offer some quick and easy suggestions of ways to include new and exciting grocery items to help provide me with some diversity. As someone who can often fall into a routine when it comes to eating (I have the same breakfast every day and tend to revert to one of a few different dinners) having her provide me with some ideas was excellent.
My favourite part of the entire experience was having Karley walk me through the aisles, showing me some of the items we talked about (so many different beans and grains), and even teaching me a few different ways to prepare foods I was already eating regularly (like spaghetti squash). Even though I have shopped at my local Loblaws for years, I was still able to learn and find new items in the store in aisles I may not have normally visited. Now I have bacon maple tempeh in my fridge as a result, and it is DELICIOUS.
One of my goals when meeting with the dietitian was to find ways to incorporate more plant-based protein in my diet and find different snack ideas. Luckily, after a quick walk through the store and some suggestions, I was well on my way. My first grocery shop following the appointment had me walking the aisles with a new and improved cart and inspiration for the kitchen.
I’m going to share a few recipes with you today, inspired by my appointment and showcasing some of the things I learned from Karley.
The first recipe is something I can’t get enough of: tzatziki. I wanted to take advantage of the locally grown cucumbers and to create something that was light and refreshing for summer, it has quickly become the base for many snacks and meals! In fact, it is going to be the basis of several the following recipes. It has also become a great way for me to add some heft to snack time. Whether it is using it as a dip, or as a sauce base, tzatziki allows me to get a protein-rich snack with healthy veggies and a great serving of healthy fats.
1 2/3 cups plain Greek yoghurt (opt for the full fat here)
1.5 tablespoons extra-virgin olive oil
2.5 tablespoons chopped fresh dill
1 tablespoon lemon juice
2 medium clove garlic, pressed or minced
½ teaspoon fine sea salt
Instructions:
One handful at a time, squeeze the grated cucumber in your hands above the sink to remove the moisture. Transfer to a serving bowl and repeat with the remaining cucumber.
Add the yoghurt, olive oil, herbs, lemon juice, garlic, and salt to the bowl, and stir to blend. Let sit for 5-10 minutes before tasting as you want the flavours to mix together. You may need to add some more herbs or salt depending on the flavour of the produce you had.
Serve immediately or cover and keep in the fridge for 3-5 days.
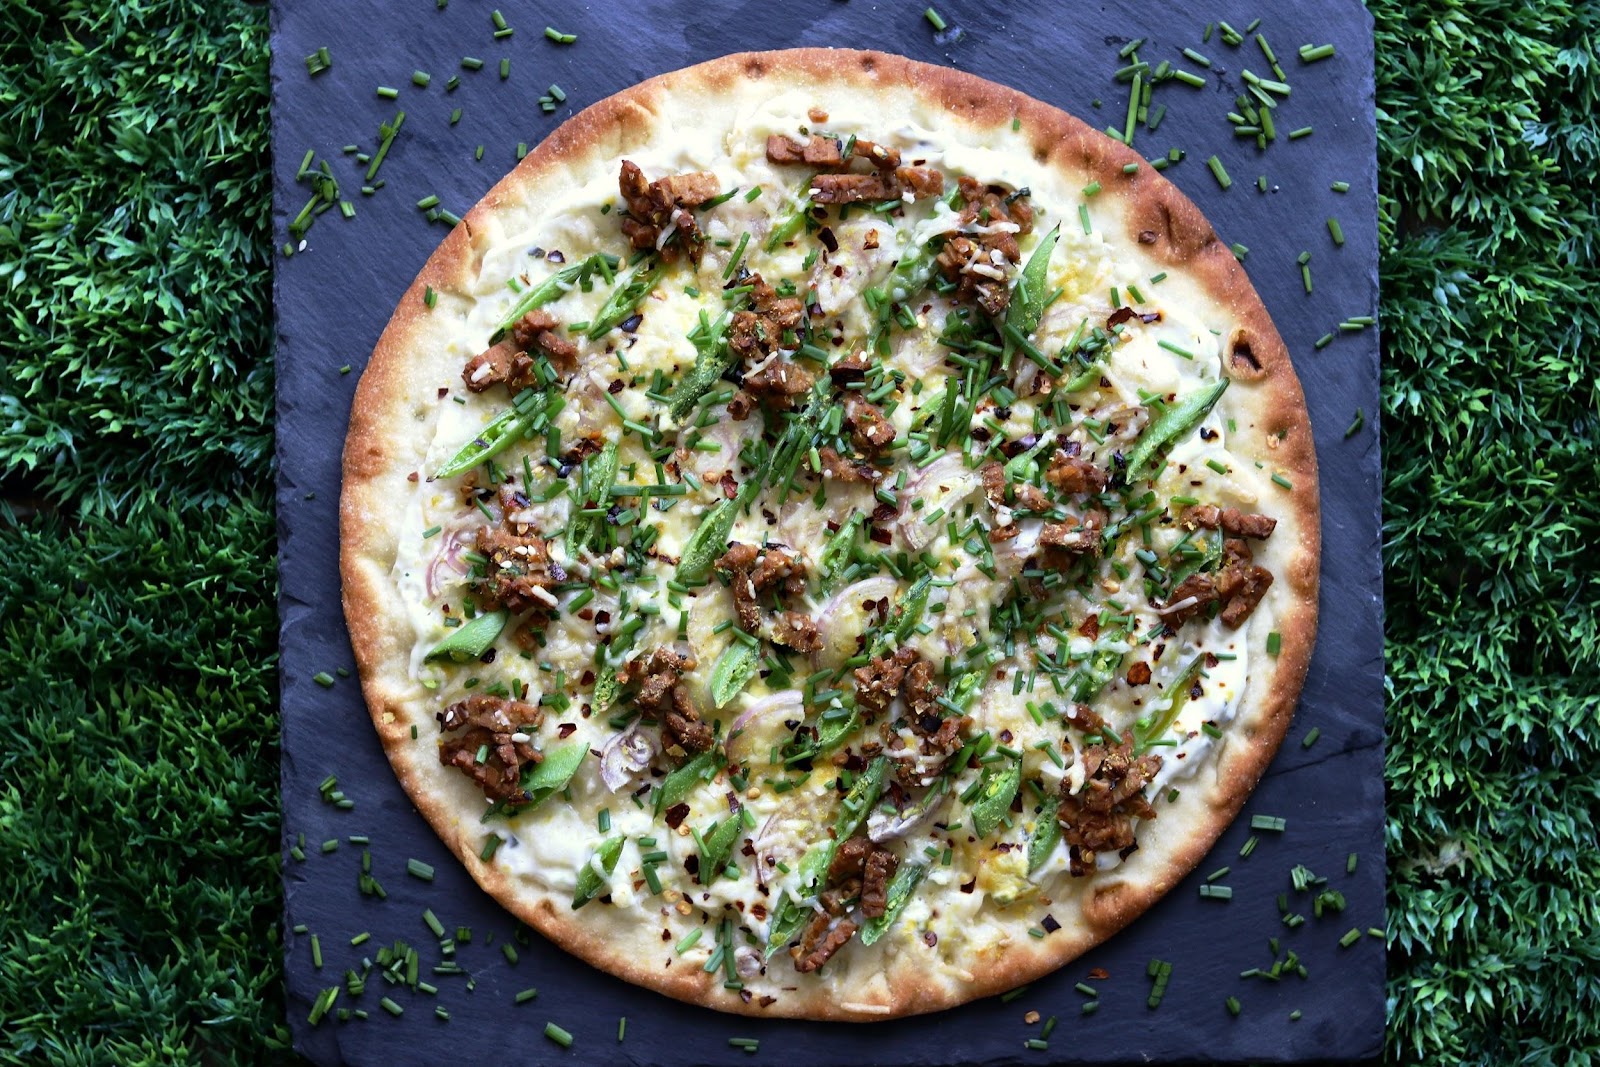
Now that you’ve got the tzatziki, you have so many different meals and snacks you can make! My favourite (and one of my favourite things I have made this year) is the tzatziki pizza with freshly grated parmesan, bacon maple tempeh and shredded snap peas. Looking for some interesting plant-based proteins, Karley suggested tempeh. Since I’m not a huge fan of tofu (texture, not taste) tempeh was a great option for me. A plant-based protein, it is very healthy for you. It is high in protein, low in fat, and low in sugar and sodium. It makes for a great protein option. Looking for ways to include this in my diet, I’ve added it as the bacon to my breakfast sandwich and have even started using it in my partner’s lunches. The best was though has been as a topping on my pizza. Inspired by a lot of the beautiful white pizzas I have been seeing on Instagram lately, I thought this would be a chance to put a health-conscious version of one out there.
Ingredients:
1 Ready Made Pizza Dough (I opted for a PC Thin Crust Pizza Flatbread)
2 shallots, thinly sliced
1/3 cup tzatziki
1 cup shredded snap peas
1/4 cup parmesan cheese shredded
1/4 cup crumbled tempeh (I opted for the PC Blue Menu Bacon Maple Tempeh)
Pinch of black pepper
Freshly chopped chives to serve
Instructions:
Preheat oven to 450F.
Scoop tzatziki directly onto the crust, spreading with the back of a spoon to evenly distribute.
In alternating rows, place snap peas and shallots (This will give you clean lines and make for a delicious pizza when you cut into slices).
Work from the outside in, place the tempeh in little piles all over the pizza. You want to make sure that each piece will have a nice balance of all the ingredients, so be mindful where you’re placing).
Sprinkle parmesan evenly over the pizza and add a pinch of black pepper before baking.
Bake for 5-7 minutes or until the crust is golden brown.
Remove from oven and let cool for 5 minutes before serving, and sprinkle with chives before eating
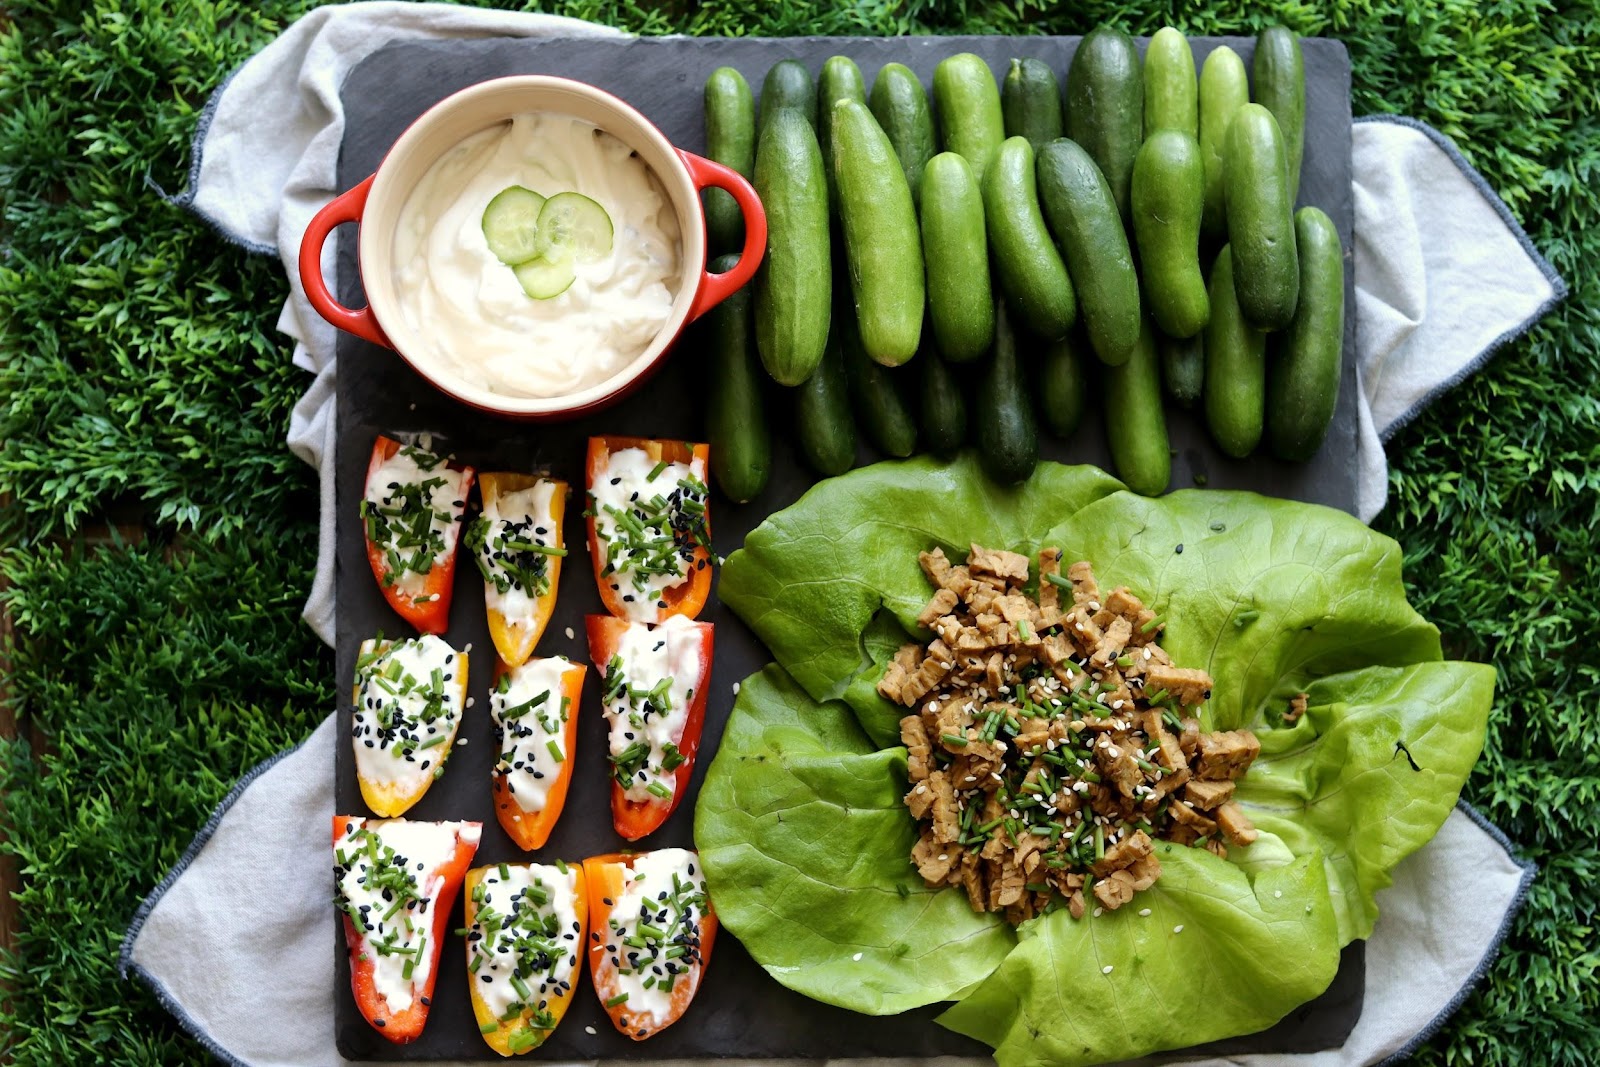
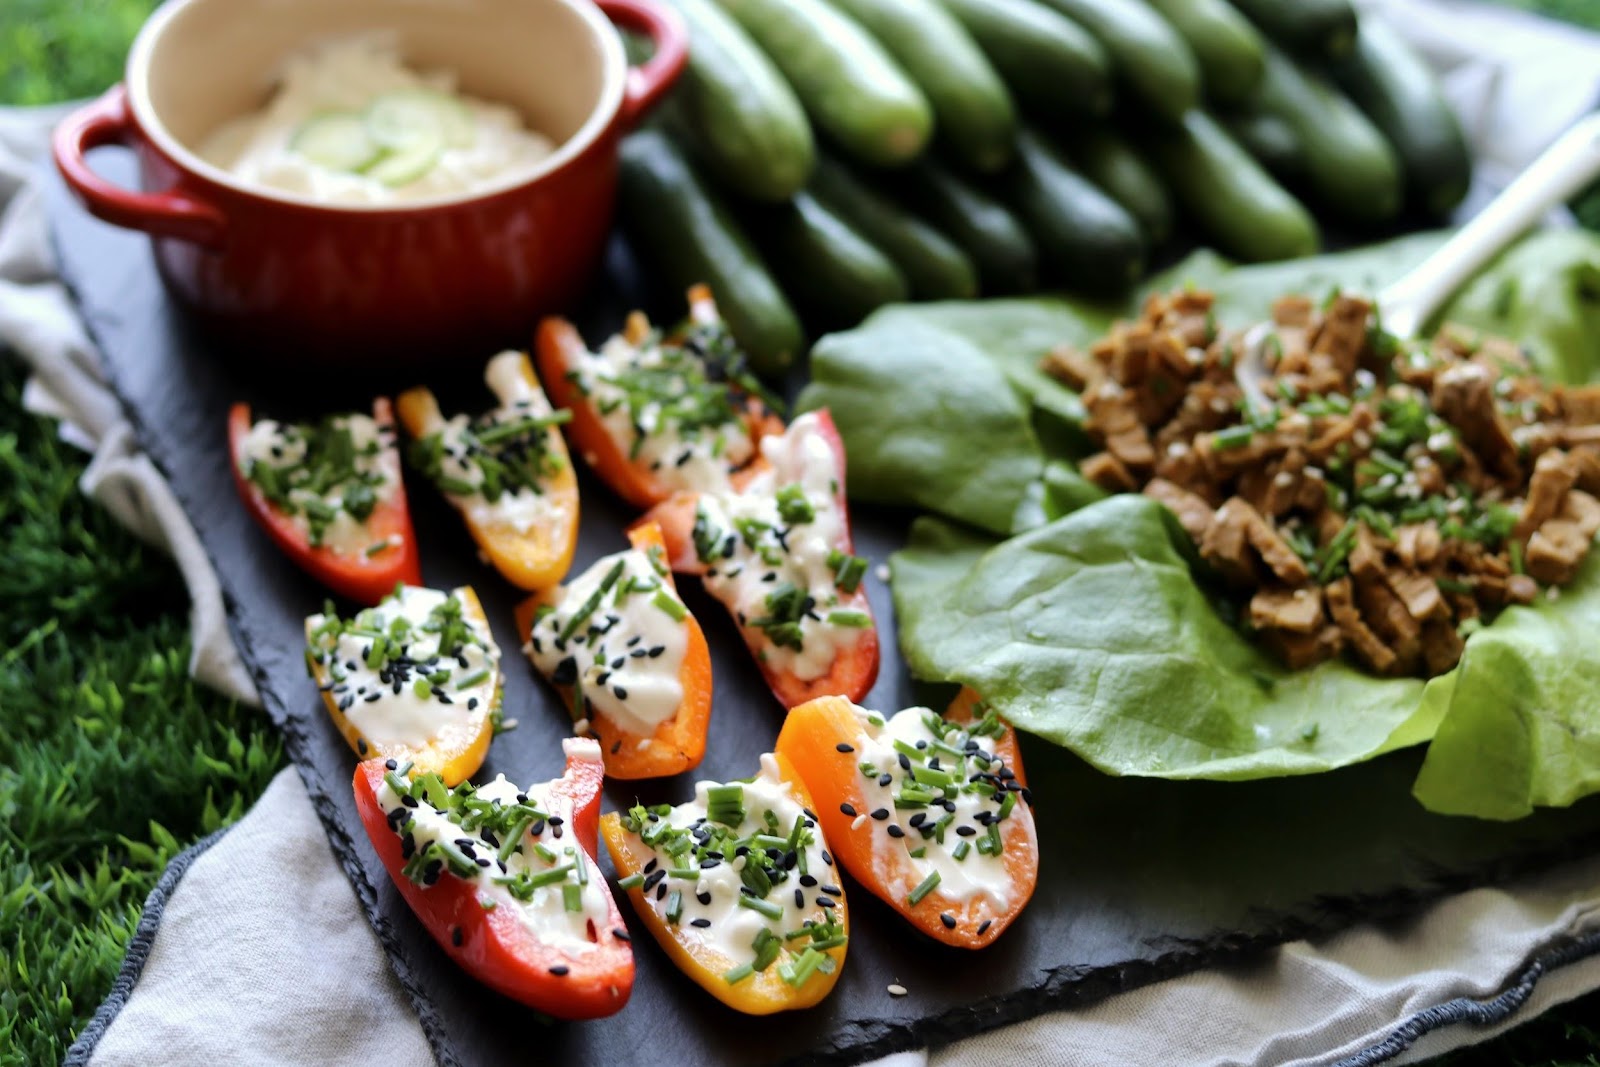
Now I know I mentioned I was looking for great snack options in addition to meal options. Snacks are important for me, and if I’m being honest, a place that can make or break a day of healthy eating. So, ensuring I had healthy snack options at home that were also tasty was important. I’m a big fan of crunch in my snacks. Cookies, crackers, chips- anything that is crispy, or I can bite into for crunch is the perfect snack in my mind. Karley was great at offering different suggestions for snacks that could fit that build, and I decided to take a lot of those suggestions and turn them into the ultimate snack tray! Using all of the fantastic summer produce that is available at Loblaws (locally grown cucumbers, peppers, herbs and greens) I was thrilled to put this together because it meant snack time could not only be healthy, but a bit of an event (perfect for weeknight get-togethers or even Netflix on the couch).
Ingredients:
3-4 leaves Boston Lettuce (Loblaws had SO many varieties, all Ontario grown)
½ Cup Flavoured Tempeh (I opted for PC Blue Menu Maple Bacon)
10-12 Mini Sweet Peppers (Look for Ontario grown)
2-3 Cups PC Mini Cucumbers, whole
1 Cup Tzatziki
2 Tbsp fresh chives, chopped finely
Instructions:
Arrange on a board or tray, placing tempeh into the Boston lettuce leaves as a wrap. Cut the peppers in half and stuff with the tzatziki, topping with fresh chives. Arrange cucumbers, add the bowl of tzatziki and serve!
If you’re looking for another way to serve up those beautiful fresh greens and enjoy the beautiful crunch of Ontario summer vegetables, I’m using something I had never bought before, and came suggested by Karley. Utilizing the rice paper, you can buy in the rice aisle, these sheets are amazing. Soak for 5 seconds in warm water and lay flat and you now have essentially a spring roll wrapper, but for cold items!
Ingredients:
8 Rice paper wraps (you’ll find these in the dry ingredient aisle usually with the international rices)
½ large cucumber, julienned
1 red pepper, julienned
1 yellow pepper, julienned
4 asparagus stalks, julienned
Black or white sesame seeds, to sprinkle on top
Instructions:
Follow the instructions on your rice paper to get them ready for wrapping (typically, soak in hot water for 5 seconds and immediately lay on a flat surface.
Place a mixture of the julienned vegetables in the bottom centre of the circle.
Fold in the sides of the circle to meet in the middle of the vegetables.
Roll from the bottom of the circle to the top, being careful to create a seal.
Sprinkle with sesame seeds and serve with a dip or eat on their own!
I hope you’ve been able to take some of these suggestions and ideas and be inspired to include them in your day to day life. There is so much fantastic produce this time of year in Ontario (and Canada as a whole) that it makes it easy to snack and feast on all the amazing fruits and vegetables that Canada has to offer, no matter your food preferences!
This post has been sponsored by Loblaws. Although they have provided me financial compensation and products, my opinion and words are all my own. I am in partnership with Loblaws and will be bringing blog posts and recipes throughout the rest of the year, and all partnered posts will be marked as sponsored.
Food is one of my favourite things. It is something you can talk about, watch on TV, read in books, learn about in school, and most importantly, bond over. Growing up food was not something I was passionate about, nor something I really cared about (other than to eat). It wasn’t until my late teens and early twenties when I was on my own that I started to not only appreciate food – the flavours, the smells, the work that goes into it – but see first-hand how it can be a fantastic way to learn more about those around you, connect with people you thought you had little in common, and share experiences you may never have had otherwise.
Over the last few years, I have immersed myself in food. I have countless (no seriously, countless- see picture below) cookbooks which I have read front to back like they are novels as well as a growing collection of food-based history and literature (everything from the history of the apple in North America to books on food fights and culture wars all which revolve around an ingredient or a dish). I have also had the chance to experience numerous food-based experiences from fine dining tasting menus, to trips and vacations all which start around a conversation of “What food should we eat when we’re away.”
So when Loblaws came to me with the opportunity to share stories and recipes revolving around #FoodLoversUnite I couldn’t have been more excited. Loblaws was already my grocery store I’ve shopped at for years, so it was a nice way to combine my love of a place I spend a lot of time in, and their vision that food can bring everyone together. As part of my partnership with Loblaws, I’ll be sharing a number of recipes that involve different ingredients or themes. The first is that no matter what your food preference, we’re all food lovers. The ingredient I was chosen to feature was asparagus. What I love about getting asparagus is the fact that it is in season. It tastes so much better and I love knowing that it is coming from Canadian farmers. At my Loblaws (Maple Leaf Gardens if you ever want to visit it) during peak growing season (June-August) more than 50% of produce is coming from Canadian farmers (and this isn’t just my Loblaws, that is Loblaws across Canada). Loblaws works with over 450 Canadian farmers and continues to grow that which makes shopping Canadian and supporting our own farmers that much easier. If you have the chance, I encourage you to try in-season produce at Loblaws, especially when you see it is from Canadian growers, you’ll be impressed by the quality and taste!
Asparagus was one of the first vegetables I remember liking as a child and one that I keep in my fridge almost all year round! Whether it’s quickly blanched and served super crisp, or oven-roasted to a beautiful toasty finish, for me, you can’t go wrong with asparagus. According to a poll done by Correlated, in general, 72% of people like asparagus. While that may seem like a lot, that also means that nearly 30% of people don’t! One of that 30% of people also happens to be one of my best friends Maleah. So with her in mind (and on her way over for dinner this week) I wanted to make something that asparagus could be the star of (for me) but could also be replaced and still be delicious for Maleah. I settled on Corncakes!
For myself, I made Asparagus, Bacon and Feta Corncakes. These are such a delicious spring and summer treat. They’re not super complex, and don’t take a long time to make so even the most kitchen shy person can make these with success! You can easily swap out the asparagus in this recipe for fresh peas, corn, scallions or leeks and still have a scrumptious dish. For Maleah, I swapped out the asparagus for leeks because they’re one of her favourite vegetables. I simply divided the batter into 2 once it was combined and mixed in the asparagus and leeks separately meaning we’d both got exactly what we wanted!
Ingredients:
1 Cup+ 2 Tbsp Grilled Asparagus, grilled or charred, diced (or substitute with 1 cup fresh peas or 1 cup fresh corn or 1 cup shredded leeks)
2.5 tbsp olive oil
6 slices bacon, baked, chopped
1 cup finely ground cornmeal (the higher quality the better)
1/2 cup+1 Tbsp all-purpose flour
1-1/2 tsp baking powder
3/4 tsp salt
1/2 tsp garlic powder
1/4 tsp cayenne pepper
1/2 cup feta cheese, crumbled (pat dry before crumbling)
1 cup whole milk
1 extra large egg
2 Green Onion, finely chopped
Neutral Oil for frying (canola, sunflower, etc…)
Instructions:
Preheat oven to 400F.
Clean your asparagus, cut the hard woody ends off and drizzle with your olive oil. Sprinkle with salt and pepper.
Preheat your grill or pan to medium heat. Add asparagus, and cook until slightly blackened and cooked- 3-4 minutes on each side. Once cooked, remove from heat and let cool. Cut into 1″ pieces after, reserving the tips.
With your oven heated, cook your bacon on a sheet pan covered with parchment paper for 15-20 minutes (you want the bacon crispy, but not so much so that it breaks into too many small pieces when cutting). Remove and let cool before dicing the bacon. Reserve the bacon drippings from the pan.
In a large bowl, combine the cornmeal, flour, baking powder, salt, garlic powder, and cayenne pepper.
In a medium bowl, whisk the milk and egg together. Once thoroughly combined add the feta, half the bacon crumbles, 2 tbsp of the reserved bacon drippings, both green onions and To it, add the crumbled feta, half of the diced bacon, 2 tablespoons of the bacon drippings, the green onion, and the diced asparagus (keeping aside the tips mentioned before).
Add the wet ingredients to the dry, mixing well- you want to avoid clumps as they’ll leave floury pockets that aren’t enjoyable.
Heat a large frying pan to medium-high heat. Add leftover bacon drippings into the pan and enough oil so that the bottom of the pan is thinly covered.
Using an ice-cream scoop, scoop mixture directly into the hot pan.
Cook each side until golden and firm. This should take 2-3 minutes depending on your pan. Keep a close eye on them as they can burn easily. As they’re finished, place them on a paper towel to absorb the oil (if you don’t they’ll get soggy- also, don’t stack them on top of each other as they dry).
Serve with sour cream, the leftover bacon crumble and the asparagus tips!
If fried foods aren’t your favourite, or if you’re simply looking for something a little more satiating (you have to eat a lot of corn cakes to make it count as a meal in my opinion) then I’ve included a couple of other recipes that could help round out a great breakfast, brunch, lunch or dinner!
Now, if your childhood was anything like mine then one of your first baked goods memories was likely of either cookies or bread- probably banana bread or some sort of similar loaf (my mom would always make this great zucchini bread before I even knew that I enjoyed zucchini). Loaves and bread quickly became some of the first things I ever attempted to bake and something I continue to go back to again and again. (I’ve got a beautiful cinnamon swirl loaf I’ll share at some point). So when thinking of ways to make foods where an ingredient could be replaced my mind immediately went to a bread.
It took me a few tries to get this right (my first version was way too dry, and the second was too oily and there was an after taste I didn’t love) and that got me to here. I took elements from a couple of other types of breads (an olive oil bread for the texture and consistency) as well as from cakey bread (like the cinnamon swirl loaf I mentioned above) and was pleased with the outcome. No need for yeast, butter, or even to really prep your ingredients (other than the asparagus) before baking. You can also easily substitute the asparagus in this recipe with leeks, green onions, or even shaved white onions lightly sautéed. So without making you read more, I’ll get to the point- this is a recipe for a CheesyAsparagus, Sundried Tomato and Black Olive Bread.
Ingredients:
1/2 Cup Olive Oil (plus 2 tbsp reserved)
1/2 lb of fresh asparagus, woody ends removed, cut into four parts
1 1/3 Cup self rising cake flour
1.5 Tbsp Herbs de Provence
3 XL eggs, beaten
1/2 Cup 3.5% Milk
15 Pitted Olives (black or green)
2/3 Cup Sun-dried Tomatoes (roughly chopped)
1 Cup Finely Grated Beaufort Cheese
Instructions
Preheat oven to 375F.
Line the inside of a loaf pan with parchment paper, set aside.
Pan fry the asparagus on high heat in the reserved olive oil until lightly browned. Remove from heat, pat dry, salt, set aside.
In a large bowl, combine the flour and herbs de provence by whisking. Once combined, make a well in the middle and add eggs, milk and oil while stirring constantly, bringing the flour into the middle. Mix for about a minute until you have a smooth batter.
Save a few asparagus tips and olives, place aside. Using the rest of the asparagus, olives and 2/3 of the cheese, add to the batter until combined.
Pour batter into loaf pan, and top with remaining asparagus, olives and top with cheese.
Bake for 40 minutes or until golden brown and crispy on top, and seemingly firm. Once cooked, remove from oven and let cool in loaf pan for 10 minutes before removing onto a wire rack.
Slice and enjoy!
So far we’ve had some great snacks and sides, but haven’t had a chance to feed a crowd with a meal item. We’ve had two fairly cakey and heavy items, but what about when you’re looking for something a bit lighter?
Well, I wanted to combine two of my favourite things in order to help the asparagus shine, but also allow for any other ingredients used in place of the asparagus to shine. What are those favourite things? Puff pastry and goat cheese!
I bake to calm down and relax after a long day. There is nothing more cathartic than being able to get set up in the kitchen, put my music on, and shortly thereafter come out of the kitchen with cookies or cakes or flaky treats. I’ll often make my own puff pastry ahead of time to use for different treats, but in fairness, I don’t think it’s necessary for this recipe. I used store-bought puff pastry and it turned out GREAT.
But what turned out great? Well, the final recipe is my Asparagus and Goat Cheese Tart!
Ingredients:
1lb Asparagus (or substitute with 1lb shaved leeks) cut into 1/5ths
1/2lb defrosted puff pastry
1/2lb herbed goat cheese
1 XL egg yolk mixed with 1tsp water
1 large shallot, finely chopped
6 slices of bacon (or substitute finely chopped salami)
Instructions:
Preheat oven to 450F.
With your oven heated, cook your bacon on a sheet pan covered with parchment paper for 12-15 minutes (you want the bacon crispy, but not so much so that it breaks into too many small pieces when cutting). Remove and let cool before dicing the bacon. Reserve 1tbsp of the bacon grease.
In a pan, heat bacon grease over medium high heat, and cook shallots for 1 minute, add the asparagus, and cook for another minute. Remove from heat and add the diced bacon to the asparagus and shallot mix.
On a lightly floured surface, roll out the puff pastry to a rectangle roughly 11x 14″. Move the puff pastry onto a parchment lined baking sheet.
Lightly press the goat cheese into the puff pastry, leaving a 1″ border around the edge. Then add the asparagus, shallot and bacon mix. Season generously with pepper and lightly salt (the bacon will have the salt).
Brush the edges with the water and egg yolk mix to allow the edges to brown while baking.
Bake for 20-25 minutes. Let cool and serve!
Let me know if you make any of these recipes and be sure to tag me at @JackDHarding on Instagram! You can also DM me anytime with questions or tips on these recipes or any other on my site and I’ll happily help you out.
")


")


")